top of page
Post-012
Jan. 23rd, 2022
Yo-yo robot part 2: finishing machining and assembly.
"What if we WuTang generator Alex Hattori and name the robot after that?" — John

Ok day two of the yo-yo robot and today the goal — is to get the arm built and the hardware "finished" with the notable exception of the encoder that has not arrived yet. So our third and final update on this project (which will happen in the next few days) will just be about the encoder and then controls and actually yo-yo'ing with the robot.
The arm is going to also be a super simple design. A single carbon-fiber tripod boom supported on one end by a piece of metal attached to a metal hub that attaches to the motor shaft, and on the other end some hook to hold the yo-yo maybe the same piece on the front and the back if we decide to use some of those v-groove bearings to hold the string of the yo-yo.


Here's a picture of what we're going to make (in CAD) next to a picture of the carbon fiber tripod arm. The arm is roughly 12in long. The bracket we're making is 0.5" thick with M4 tapped holes on the face and a 1/4"-20 tapped hole on the back for mounting to the screw on the tripod leg. This may become an F-Drill clearance hole if we choose to use the same piece for the top as a "hook." We'll cut two of them and decide if it's too heavy or not. The whole piece is around 2" long total.

This piece mounts to the 10mm diameter hub we bought and follows the mounting hole pattern that the manufacturer stated for the hub. Here it's shown hanging out on the shaft of the motor (not secured yet). But it's a good little hub and we think he will work well for this low-torque application. The motor can produce around 7Nm at stall so we want to ensure the arm is not super heavy and doesn't have much inertia otherwise we might get a sad motor that can't yo the yo-yo. Based on that fact, we're thinking we might not have a metal bracket on the other end of the arm, maybe just some simple mechanism that holds the yo-yo on.


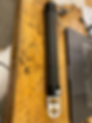
While we were waiting for the waterjet, we found this piece of 316 stainless steel 1/16" that was already bent into an "L" shape and got an idea. We drilled a 1/4" clearance hole in it and two 5mm M4 clearance holes and sandblasted it and mounted it on the end of the rod using a 1/4" screw. We will later (today) mount some of those v-mount bearings that take M4 screws to the front to make the yo-yo holding mechanism. Sorry if that's unclear but we're still not super sure how it's going to look so we'll leave that discussion for later in the post but we think the bracket will work to hold the yo-yo on.
For now we're going to move onto water-jetting, sandblasting, and tapping that new part for the back of the arm that we designed above. I just heard from Carolina that the yo-yo is around 70-75 grams. If we assume a 1-foot arm (0.3m), and 7Nm of torque, that means we can generate a max force of 2.4kgf vs. the weight of the yo-yo being around 0.07kgf. Factoring in inertia as well as mass of the arm, that' should be more than enough to generate the yo-yo'ing force we need.


Here's some images of the water-jetting, I made a slight error water-jetting the parts and the holes ended up too big, so instead of M4 taps they will be M4 clearance. The 1/4-20" hole will still be drilled and tapped. We of course gave it a nice sandblasted finish to go along with the rest of the robot.


Here's are some obligatory drilling and tapping process photos, we drilled on the mill and tapped by hand as we usually do.


We went up to D-lab to gather some screws to assemble the whole thing together. We needed a 1/4"-20 screw to attach the L-bracket to the front of the carbon fiber pole. We found a small socket head cap screw that will work nicely.
Above are some pictures of the fully assembled arm before being bolted on the hub. I like how it turned out! It's important to point out that the front and back pieces on the rod, since they were screwed on separately may need better alignment than the "precision eyeballing" we did but we'll cross that bridge when we get to controls. We're going to go grab some screws and hardware from Simmons and bolt the whole assembly together next.

Here's a fun image of the starting pile of parts we have for final assembly of the robot. Some v-groove bearings, some screws, the arm, and the base.


We started by taking some metric screws and bolting the hub onto the arm. We don't have lock-nuts for right now but we'll replace them later. The hub mounts to the motor using two set screws. One on the bottom that goes into the circular face of the shaft which is a normal set screw that came with the hub, and a large one that drives into the flat part of the "D" shaft. These two should secure the arm enough for the torque we are applying.


Here's some pictures of the mounting of the v-groove pullies to the L-bracket. We used regular metric screws, lock washers, a few metal spacers, and the V-pullies. The pullies don't spin on this design and they don't actually have to, they're just going to act as guides to hold the yo-yo string straight as the robot is yo-ing the yo-yo.

Here's a picture of the final assembly with John Zhang in the background. The eagle-eyed reader might notice the ODrive looks a little different from last time with no power wires hanging off the board rather the XT60 mounted directly to the board. This is because I tested the original ODrive last night and I had accidentally wired the polarity in reverse (my fault) which cause a short between +/- when I connected the battery so we had a small fire on our hands (current was conducting through the MOSFET body diodes). Luckily we were quick to unplug the battery but don't wire an ODrive wrong! That's what we learned.
So we mounted a new ODrive onto the system and this allowed us to search for and find silicone wires to use to connect the motor which was a plus because they're much nicer than the copper stuff. The last thing we want today is put the yo-yo on the robot.

And here it is! The final robot minus the encoder with a Yo-yo on it! I think he looks cute and we're going to have to come up with a name for him (as we name all our things). After some thinking and asking John Zhang we came up with "Alex Hattori Jr." which is quite fitting and we think Alex would be proud. We decided not to go with WuTang for this one, maybe a future robot.
So what's left doing?
-
Well we want to flash the latest ODrive firmware, test that, and make sure the ODrive is working but we may wait for the encoder for that one.
-
We have to mount the encoder.
-
We have to do controls, like all the controls so that should be a fun adventure. We're hoping physics will just let us yo the yo-yo up and down with some ease and then maybe we can build a second Alex Hattori Jr. and get both of them yo-ing a fancier yo-yo and add even more "yo" to the "yo-yo-ing" if you know what I mean.
-
Maybe we're over-simplifying this problem and controls will be super hard but I guess time will tell.
But for now, we have a pretty sculpture, chaio, and 'till next time!
#alex-hattori-jr #yo-yo-ing #assembly #hardware
bottom of page